
Introduction
Embroidered logos are the hallmark of professional workwear: the left-chest polo, the cap front, the jacket back. Getting that logo to look sharp and last through hundreds of washes starts long before a needle touches fabric. It starts with digitizing.
Logo digitizing is the process of converting your artwork into a machine-readable stitch file — a set of coordinate data and machine commands that tells an embroidery machine exactly where to stitch, in what order, and with which stitch type. Without it, no logo can be embroidered.
The concept sounds simple enough. In practice, results vary dramatically — based on artwork quality, fabric type, stitch planning, and execution at every step. A well-digitized logo holds up through 100 commercial washes. A poorly digitized one can distort on the first wear.
This guide walks buyers and brand managers through what digitizing actually involves, what to prepare before submitting artwork, and which mistakes to avoid — so you can order custom branded workwear with confidence.
Key Takeaways
- Logo digitizing converts artwork (ideally a vector file) into a stitch file (.DST, .PES, etc.) — a required step before any logo can be embroidered
- Designs with gradients, thin lines, or small text need simplification before they translate cleanly to thread
- Each fabric type requires its own density, underlay, and tension settings — never assume one stitch file works across all materials
- Always test sew-out on the actual fabric before committing to bulk production
- A full-service partner manages digitizing, file coordination, and production — so you focus on the order, not the process
What You Need Before Digitizing Your Logo for Workwear
Preparation quality directly determines digitizing accuracy. Submitting the right artwork in the right format prevents costly rework and production delays.
Artwork Format and Quality
Vector files — AI, EPS, or PDF with live artwork — are strongly preferred. They scale without quality loss and translate cleanly into stitch objects. High-resolution PNG or TIFF files can work but may require additional cleanup before digitizing begins.
Do not submit JPGs pulled from a website. These files are too low-resolution, and they force the digitizer to guess at edges and color boundaries — which shows up as fuzzy stitching.
Also include a brand color guide or Pantone references. Thread makers like Madeira offer Pantone-to-thread matching tools, but expect some perceptual difference due to thread sheen and palette limits. A Pantone reference gives your digitizer the best chance of a close match.
Logo Complexity Assessment
Not every logo is workwear-ready straight out of a brand standards guide. Elements that cause problems in digitizing:
- Gradients and drop shadows — thread cannot replicate continuous tone; these need to be reinterpreted as solid fills
- Thin lines under 0.5mm — they collapse on heavier fabrics and often need to be widened
- Text smaller than 0.25 inches — Melco's embroidery guidelines confirm this as a practical minimum for readable lettering; sans-serif fonts perform better at small sizes
- Very fine detail — elements closer than 2mm tend to merge together at standard thread weight
A good digitizing service will flag these issues before proceeding. Having a simplified, workwear-ready version of your logo prepared in advance cuts turnaround time and avoids back-and-forth revisions.
Production Context Details
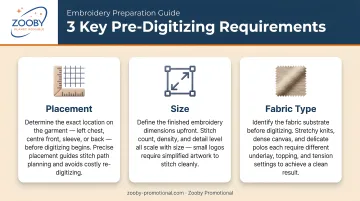
Before digitizing begins, three things must be confirmed:
- Intended placement — left chest, sleeve, back yoke, cap front
- Target size in inches — a left-chest logo on a polo typically runs 3–3.5 inches wide; a jacket back can accommodate 10–12 inches
- Fabric type — because digitizing settings for a cotton pique polo differ significantly from a hi-vis polyester safety vest
Businesses ordering through a full-service partner like Zooby Promotional have these details coordinated upfront. Zooby's team manages artwork submission, placement specs, and fabric compatibility as part of the ordering process, so clients don't have to sort through those decisions independently.
How to Digitize a Logo for Custom Workwear: Step by Step
Professional digitizing follows a structured workflow. Shortcuts at any stage produce poor stitch quality — problems that often stay hidden until production is already underway.
Step 1: Logo Submission and Review
The client sends artwork along with placement, size, and fabric details. A trained digitizer reviews the file for suitability — checking line weights, color count, and element sizing. Reputable services flag problem elements and request approval before proceeding rather than auto-converting.
This review step matters. If a digitizer converts your artwork without flagging that your tagline text is too small to read at 3 inches, you won't find out until the sew-out — or after the bulk run has already shipped.
Step 2: Stitch Path Mapping and Type Assignment
This is where manual skill separates professional digitizing from automated conversion. A trained digitizer maps the stitching sequence by hand, assigning stitch types to each element:
| Logo Element | Stitch Type | Notes |
|---|---|---|
| Text, outlines, borders | Satin stitch | Best between 1.5mm–10mm wide |
| Large solid color areas | Fill/tatami stitch | Flatter, textured coverage |
| Fine details, travel paths | Running stitch | Single-line outlines |
Stitching order matters as much as stitch type. Incorrect sequencing causes thread trapping between color sections, registration issues, and fuzzy edges where clean boundaries should be.
Step 3: Fabric-Specific Adjustments
Once the basic stitch file is built, the digitizer adjusts settings for the target fabric. These adjustments include underlay type, stitch density, and pull compensation. Here is how the most common workwear fabrics differ:
- Cotton pique knit — stable surface, moderate density, standard underlay
- Hi-vis/polyester — reduced density, lower pull tension, topping layer recommended to keep stitches from slipping on the slick surface
- Fleece — high underlay count, shorter stitches to prevent designs from sinking into the pile
- Ripstop/canvas — heavier needle path, wider satin widths to handle the coarser weave
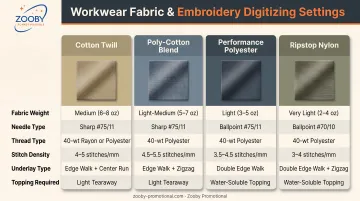
Applying a stitch file optimized for cotton pique to a fleece garment produces puckering, thread gaps, or surface distortion. That outcome typically means reembroidering or replacing garments — a cost that proper fabric adjustment prevents upfront.
Step 4: Test Sew-Out
Before the file is finalized, a sample is stitched on the same fabric at the intended size. The sew-out gets inspected for:
- Alignment accuracy across all elements
- Stitch density consistency
- Color clarity and thread tension
- Whether fine text is readable at actual size
This step is the safety net. Problems caught here get fixed before bulk production. Problems missed here multiply across every garment in the order.
Step 5: File Delivery and Format Compatibility
Once approved, the finalized stitch file is delivered in the format compatible with the production machine. Common formats include:
- DST — Tajima machines
- PES — Brother/Baby Lock
- JEF — Janome
- EXP — Melco/BERNINA
- HUS/VP3 — Husqvarna/Viking
With format confirmed, the next consideration is timing. Standard professional digitizing takes 24–48 hours for a completed stitch file; rush orders are often turned around in 4–8 hours for less complex designs. Total time from artwork submission to approved production file also depends on how many revision rounds the sew-out requires.
Professional services retain the finalized file on record, which ensures consistent results if you reorder the same design months later.
Common Mistakes That Ruin Digitized Logos on Workwear
Most embroidery quality failures trace back to a small set of avoidable errors.
Auto-digitizing software produces poor results on workwear. Automated conversion tools misinterpret complex curves, assign incorrect stitch types, and routinely skip underlay. The result looks fine on-screen but stitches poorly on textured fabrics. Wilcom's own API documentation flags complex artwork as unsuitable for automated conversion at scale. Manual digitizing by a trained professional is categorically different — the stitch path logic is intentional, not algorithmically guessed.
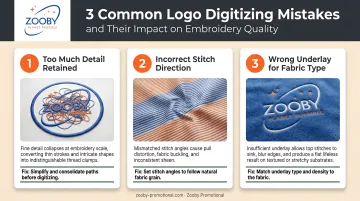
Logos that are too detailed for their intended size fail in production. Fine gradients, multiple thin lines, and dense small text don't scale down gracefully in thread. At a 3-inch left-chest placement, a logo with six colors and hairline typography often becomes unrecognizable — the machine either fills gaps into a muddy shape or skips details entirely. The fix is a simplified workwear version of the logo before production, not a workaround after.
Skipping the test sew-out is the most costly shortcut. Without a physical sew-out on actual production fabric, issues like registration errors, incorrect thread tension, and placement drift only surface during the bulk run. At that point, reembroidering or replacing garments is expensive and time-consuming. The sew-out approval step adds a day or two to the timeline. It regularly saves orders.
Alternatives to Embroidered Logos on Custom Workwear
Embroidery is the standard for professional workwear, but it is not always the right fit for every logo, garment type, or order scenario.
Screen Printing
Best for:
- Large, full-color designs with gradients
- Back prints and chest prints with wide coverage areas
- Lightweight fabrics like t-shirts where embroidery bulk would be uncomfortable
Trade-offs: Screen printing cannot replicate the raised, three-dimensional texture of embroidery, and print durability on frequently washed workwear depends on ink type and fabric prep.
Heat Transfer / DTF (Direct-to-Film)
Best for:
- Small order quantities with no minimum
- Designs requiring photographic detail or full-color gradients
- Garments with structured panels that are difficult to hoop — certain cap styles, bags
Trade-offs: Transfer layers can crack or peel with heavy commercial washing over time, making DTF less suited for workwear that sees daily industrial or outdoor use. Ask your supplier for wash durability specs before committing.
Woven Labels and Sewn Patches
Best for:
- Delicate fabrics that cannot be directly embroidered
- Very small logo areas or removable branding requirements
- Preserving fine text and detail that falls below embroidery's minimum stitch thresholds
Trade-offs: Patches and labels add a secondary production step and require a sew-on or iron-on application process.
Zooby Promotional offers screen printing, heat transfer, and woven patches across their workwear catalog, so decoration method, garment type, and use case can all be matched through a single source.
Frequently Asked Questions
Frequently Asked Questions
How can I cover an embroidered logo on custom workwear?
Covering an existing embroidered logo typically requires sewing a patch or appliqué over the original design, re-embroidering over it with a new design (which adds thread bulk), or replacing the garment panel entirely. Accurate digitizing and a test sew-out upfront are far less costly than any of these fixes.
What are alternatives to embroidered logos on custom workwear apparel?
The main options are screen printing (best for large, full-color designs), DTF/heat transfer (best for small runs or complex graphics), and woven labels or sewn patches (best for premium or removable branding). The right choice depends on fabric type, design complexity, and how frequently the workwear will be washed.
What file format should I submit for logo digitizing?
Vector files (AI, EPS, or PDF with live artwork) are the preferred format because they scale without quality loss. High-resolution PNG or TIFF files are acceptable alternatives but may require additional cleanup before digitizing begins. Avoid submitting low-resolution JPGs.
How long does the logo digitizing process take?
Standard professional digitizing takes 24–48 hours for a completed stitch file; rush orders turn around in 4–8 hours for most designs. Final approval time also factors in test sew-out revisions, which vary by design complexity.
Can any logo be digitized for embroidery on workwear?
Designs with gradients, photographic elements, or very fine details typically need simplification before they translate well to embroidery — but most logos can be digitized with the right adjustments. A professional digitizer will identify what needs to change and deliver a workwear-optimized file before production begins.
Does logo size affect embroidery quality on workwear?
Size is one of the most critical factors. Text must be at least 0.25 inches tall to stay readable, and elements below minimum thresholds either merge or disappear entirely. Digitizers adjust stitch density and simplify details per placement — a left-chest logo and a jacket back need different settings even from the same source file.